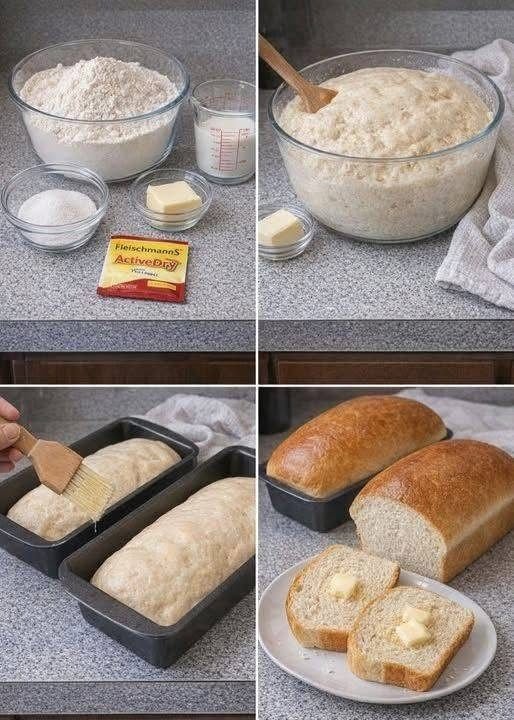
Activate the Yeast: In a large mixing bowl, combine the warm milk and 1/4 cup of the granulated sugar. Stir until the sugar dissolves. Sprinkle the active dry yeast over the top of the milk mixture. Let it sit for 5-10 minutes, or until the yeast is foamy and bubbly. This indicates the yeast is active and ready to work.
Combine Wet Ingredients: To the activated yeast mixture, add the melted and slightly cooled butter, the remaining 1/4 cup of granulated sugar, and the salt. Stir well to combine all the wet ingredients.
Begin Mixing the Dough: Gradually add 3 cups of the all-purpose flour to the wet ingredients, one cup at a time, mixing with a wooden spoon or a stand mixer with a dough hook until well combined and smooth.
Add Remaining Flour and Knead: Continue adding the remaining flour, 1/2 cup at a time, mixing until a shaggy dough forms. Once the dough starts to pull away from the sides of the bowl, turn it out onto a lightly floured surface.
Knead the Dough: Knead the dough for 8-10 minutes by hand, or 6-8 minutes with a stand mixer on medium speed, until it is smooth, elastic, and no longer sticky. You should be able to stretch a small piece of dough thinly without it tearing (the “windowpane test”). Add only a minimal amount of additional flour if necessary to prevent sticking.
First Rise (Bulk Fermentation): Lightly grease a large clean bowl with a little oil. Place the kneaded dough into the greased bowl, turning it once to coat the top. Cover the bowl tightly with plastic wrap or a clean kitchen towel. Place the bowl in a warm, draft-free place (like a turned-off oven with the light on, or near a sunny window) for 1 to 1.5 hours, or until the dough has doubled in size.
Punch Down and Divide: Once the dough has doubled, gently punch it down to release the air. Turn the dough out onto a lightly floured surface. Divide the dough in half using a sharp knife or a bench scraper.
Shape the Loaves: For each half, gently flatten it into a rectangle. Starting from one of the longer sides, tightly roll the dough into a log, pinching the seam closed at the bottom. Tuck the ends under slightly to create a neat loaf shape.
Prepare for Second Rise: Lightly grease two standard 9×5-inch loaf pans. Place one shaped loaf into each prepared pan, seam-side down.
Second Rise (Proofing): Cover the loaf pans loosely with plastic wrap or a clean kitchen towel. Return them to your warm, draft-free place for another 30-45 minutes, or until the loaves have nearly doubled in size and are puffy. They should rise about 1 inch above the rim of the pan.
Preheat Oven and Optional Wash: While the loaves are on their second rise, preheat your oven to 350°F (175°C). If desired, gently brush the tops of the risen loaves with milk or the egg wash for a golden, shiny crust.
Bake the Bread: Place the loaf pans in the preheated oven. Bake for 30-35 minutes, or until the tops are golden brown and the internal temperature reaches 200-210°F (93-99°C) when measured with an instant-read thermometer. If the tops are browning too quickly, you can loosely tent them with aluminum foil.
Cool Completely: Once baked, immediately remove the loaves from the pans and transfer them to a wire rack to cool completely. This is crucial to prevent the bottom from becoming soggy and to allow the internal structure to set properly.
Serve and Enjoy: Once cooled, slice and serve your delicious homemade Amish White Bread. It’s fantastic fresh with butter, for sandwiches, or as toast.
Cooking Tips and Variations
Yeast Freshness is Key: Always check the expiration date on your yeast. Old or inactive yeast is the number one reason bread doesn’t rise. If your yeast doesn’t foam after 5-10 minutes in the warm milk and sugar, it’s best to start over with fresh yeast.
Proper Liquid Temperature: The milk should be warm to the touch, like a baby’s bathwater. Too hot (above 120°F/49°C) will kill the yeast; too cold will inhibit its activity. An instant-read thermometer is your best friend here.
Don’t Over-Flour: Resist the urge to add too much flour during kneading. A slightly sticky dough is better than a dry, tough one. Gradually add flour until the dough is elastic and smooth, but still soft. Over-flouring will result in dense, dry bread.
The Windowpane Test: To check if your dough is adequately kneaded, pinch off a small piece and gently stretch it. If you can stretch it thin enough to see light through it without it tearing, your gluten is well developed.
Warm Environment for Rising: A warm, draft-free spot is essential for proper rising. Options include a turned-off oven with the light on, near a sunny window, or a proofing drawer if your oven has one. If your kitchen is cold, this step might take longer.
Visual Cues for Doneness: Beyond the golden-brown crust, tap the bottom of the baked loaf. It should sound hollow. An internal temperature of 200-210°F (93-99°C) is the most reliable indicator.
Cooling Completely: This cannot be stressed enough! Slicing hot bread traps steam, leading to a gummy texture. Cooling on a wire rack allows air circulation and lets the internal structure set, resulting in that perfect soft crumb.
For a Chewier Crust: Before baking, spray the oven with water to create steam, or place a pan of hot water on the bottom rack during the first 10-15 minutes of baking. This promotes a chewier crust.
Sweetener Variation: For a richer, slightly different flavor, you can substitute 1/4 cup of honey for 1/4 cup of the granulated sugar. Adjust flour slightly as needed if the dough feels too wet.
Whole Wheat Blend: For a slightly healthier twist, substitute 1-2 cups of whole wheat flour for an equal amount of all-purpose flour. You might need a little extra liquid, as whole wheat flour absorbs more.
Garlic Herb Bread: Mix in 2-3 cloves of minced garlic and 1-2 tablespoons of dried Italian herbs or fresh chopped parsley during the last few minutes of kneading for a savory loaf.
Cinnamon Swirl Bread: After the first rise, roll out each dough portion into a rectangle. Brush with melted butter, then sprinkle with a mixture of cinnamon and brown sugar. Roll up tightly and proceed with the second rise and baking.
Storage and Reheating
Countertop Storage: Once completely cooled, store homemade Amish White Bread at room temperature in an airtight container, a bread box, or a large resealable plastic bag. It will stay fresh for 3-4 days. Do not refrigerate, as this can dry out the bread and make it stale faster.
Freezing for Longer Storage: For longer storage, slice the cooled loaf and place the slices in a single layer on a baking sheet to freeze for about an hour. Once firm, transfer the frozen slices to a freezer-safe bag or airtight container. This prevents them from sticking together. Alternatively, you can freeze whole loaves, wrapped tightly in plastic wrap and then in aluminum foil. Frozen bread will keep well for up to 3 months.
Thawing Frozen Bread: To thaw individual slices, simply pop them directly into a toaster or toaster oven. For a whole loaf, remove it from the freezer and let it thaw at room temperature for several hours, or overnight. You can also warm a thawed whole loaf in a 350°F (175°C) oven for 10-15 minutes to refresh it.
Reheating Stale Bread: If your bread has become a bit stale but isn’t hard, you can revive it. Briefly dampen the crust (you can lightly spray it with water or run it quickly under the tap, avoiding the cut sides), then warm it in a 350°F (175°C) oven for 5-10 minutes. This will soften the crust and warm the interior, making it enjoyable again.
Frequently Asked Questions
Why did my bread not rise?
The most common reasons for bread not rising are inactive or expired yeast, or the liquid being too hot or too cold. Ensure your yeast is fresh and the milk is between 105-115°F (40-46°C). Also, a cold environment can significantly slow down or prevent rising, so make sure your proofing spot is warm and draft-free.
Can I use whole wheat flour instead of all-purpose flour?
Yes, you can substitute some whole wheat flour, but it will change the texture and density. For best results, start by replacing 1-2 cups of all-purpose flour with whole wheat flour. Whole wheat flour absorbs more liquid, so you might need to add a tablespoon or two of extra milk or water to achieve the desired dough consistency. The bread will be denser and have a heartier flavor.
How do I know when the bread is fully baked?
Besides a golden-brown crust, there are two reliable indicators. First, when you tap the bottom of the loaf, it should sound hollow. Second, and most accurately, use an instant-read thermometer. The internal temperature of the bread should register between 200-210°F (93-99°C) when inserted into the center of the loaf. If it’s below this, continue baking for a few more minutes.
My bread is dense and tough, what went wrong?
Dense and tough bread is usually a result of too much flour or over-kneading. Adding too much flour makes the dough stiff and difficult to rise, while over-kneading can develop the gluten too much, leading to a tough texture. Ensure you measure flour accurately and stop kneading once the dough is smooth and elastic but still soft to the touch.
